Cart is empty
Recent Blog Posts
-
06/21/2024VIDEO: What to Expect When You Submit Your Fiber to NEAFP
-
05/24/2024VIDEO: Getting Started Submitting Alpaca Fiber
-
05/24/2024NEW Downloadable Content: Memorial Day Coloring Page
-
05/03/2024Do I need to skirt my fiber before submitting to the fiber pool? NEAFP TV S01 E01
-
03/22/2024Introducing our newest U.S. Alpaca product: Textured Rib Alpaca Shawl
-
08/16/2023NEAFP Article: Email Marketing is still a MUST do for all Alpaca Farms
-
06/27/2023NEAFP Article: Off the Beaten Path Agritourism Ideas
-
04/06/2023Take our 2023 NEAFP Fiber Collection Survey!
Alpaca Coloring Pages
- Happy Memorial Day 2024: Alpaca's Grazing
- Winter #1: Build a Snowman Activity
- Winter #2: Extreme Sports
- Valentine's Day: Alpaca Wedding
- St. Patrick's Day: Leprechaun
- Spring: April Showers
- Summer: Beach Day
- 4th of July: Colonial Alpacas
- Summer: Farmer's Market
- Fall: Apple Picking
- Halloween #1: Costume Contest
- Halloween #2: Spooktacular Halloween
- Thanksgiving #1: Giving Thanks Activity
- Thanksgiving #2: Pilgrim Alpacas
- Christmas #1: Deck the Halls
- Christmas #2: Santa's Workshop
Alpaca Fact Series
Business Resources
- Article: Email is still a MUST DO for all Alpaca Farms
- Article: Off the Beaten Path Event Ideas on the Alpaca Farm
- Download: Sock Photo Download Folder
- Graphics: Shop Small this Holiday Season
- Article: Form Follows Function: Dressing for Fall and Winter 2020
- Graphics: Sock and Handwear Comparisons
- Article: A Change in the Seasons: Farms Continue to Adapt into the Busy Harvest Season
- Graphics: How to Support Alpaca Farms
- Graphics: Alpaca Fiber Properties
- Article: Customer Retention: Building Customer Loyalty for your Ecommerce Business
- Article: Harnessing Storytelling to Market Your Business
- Article: The New Normal and a Renewed Support for U.S. Alpaca
- Article: Use Gift Cards to Increase Sales
- Article: Virtual Farm Tours: Bringing People & Alpacas Together in the Virtual World
- Graphics: Get the Most out of your Fiber Harvest
- Graphics: Alpaca Knitter's Yarn Guide
- Article: Mike and Sean's Adventure in Retailing
- Article: Harnessing Holiday Sales Momentum into the New Year
- Graphics: U.S. Alpaca Holiday Gift Guide
- Graphics: Small Business Saturday Resources
- Article: Tools and Topics for Implementing Healthy Soil Agriculture
- Article: Successful Social Media Marketing for Alpaca Farms
- Article: Agritourism on the Alpaca Farm
- Article: Finding Success at Fall and Winter Markets
- Article: Brand Identity & Your Local Community
- Article: Social Media: Alpacas are STILL Seriously Trending
- Article: Let's Get Personal: Expanding your Inventory with Product Personalization
- Article: Part 2: Promoting your Brand Online through Product Styling
- Article: Promoting your Brand Online through Product Styling
- Article: 7 Old School Ways to Spread the Word about your Event
- Article: 5 Ways your Open House can increase Future Sales
- Article: Top Alpaca Related Hashtags to increase your Reach!
- Article: Alpacas are SERIOUSLY Trending
- Article: How to Utilize CO-MARKETING
- Article: Farmers Share their Booths and Tips
- Article: Mobile Payment Survey Results
- Article: Product Photography Do’s and Don'ts
- Article: Driving Business After the Holidays
- Article: Marketing Reflection and Planning
- Article: The Slow Alpaca meets Slow Fashion
- Article: Use Gift Cards to Increase Sales
- Article: The Importance of Being Mobile Friendly
Article: Product Photography Do's and Don'ts
01/27/2017
Product Photography Do's and Don'ts
By Brianna Paon
When browsing online to buy a product - a new vest let’s say - you are more than likely going to stop at one that catches your eye. It could be the vest itself that you are attracted to of course, but what we may not think about is how the product is presented and why it caught your eye in the way that it did. It could’ve been how well lit the product looked in comparison to others. It could be the crisp, white background contrasting against the vest. It could also be the crystal clear quality of the photo in comparison to photos that might appear grainy or dull. Whether we are aware of it or not, product photography has a big role in our decision to buy something, and the same thing applies to how people view your products on your online store.
While many of us may not be very well-versed in the world of photography, (I certainly am not) there are methods to achieving beautiful photography of your products that is seemingly professional, and won’t cost you an arm and a leg. Many may assume that you need to own a multi-thousand-dollar camera in order to capture professional shots, but that is not the case - there are a multitude of digital cameras, including ones under $100 that would be perfectly suitable for capturing your products (see Amazon links below). If you’re looking to purchase a camera, or already have one, familiarize yourself with the camera settings and what each setting is meant to capture. Alternatively, many of you may already own a Smartphone that will take comparable product photos to entry level digital cameras. They also offer different camera settings, similarly to regular digital cameras, and are made to be user friendly. Toying around with these camera settings is not a bad idea either, as it will help you determine which setting to use in order to get the best quality of what you’re capturing ---- this will be dependent on the product itself, the color(s) shown, the background and most especially, the lighting.
Besides the camera you use to capture your photo, the lighting may be equally as important in getting a quality product shot. Familiarizing yourself with ISO, shutter speed and aperture are especially important, as they are all focused around controlling the amount of light that enters the camera. Even the perfect angle would have a tough match against the light reflecting on and off the product you’re capturing - even our bare skin can reflect light onto an object enough for it to look drowned out! The best part, however, is that there are a number of Do-It-Yourself projects that help you to achieve the best lighting, requiring very little cost.
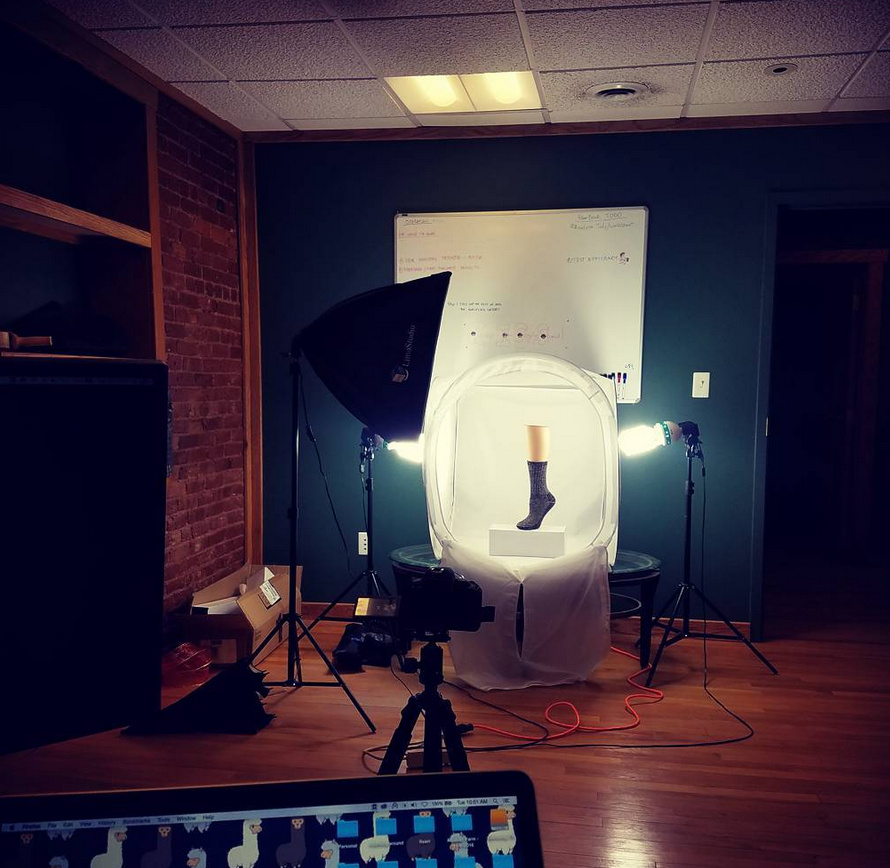
A product photography box is one of the essential tools necessary to seclude your product and surround it with the best lighting possible so that you can capture that perfect money shot. Even if you are only using your smartphone to capture your photos, using a light box may fool people into thinking you used a professional camera! Creating one of these boxes could make a world of a difference for how your products are perceived, as well as your amount of sales, and you only need to spend about $10 for the materials to do so. (Yes! Really!)
As previously mentioned, the clearer and better lit the photo of your product is, the more attracted people will become. Now that people are increasingly utilizing online avenues for their businesses, it should be in your best interest to do the same! We now live in a time where people are constantly on their phones, tablets or other mobile devices, and this is where people often will do their shopping. If you’d like to know a fun fact, it is proven that 80 percent of people remember what they see and only 20 percent of people remember what they read. This goes to show how critical it is to market your products through the use of imagery. Multiple studies suggest that social media audiences react best to visual content, which explains why the userbase on sites like Pinterest have been booming - not only is imagery much more attractive than wordy content, but social media sites such as Facebook prioritize ads based on lack of text; your image is more likely to show up in people’s feeds than a paragraph explaining what your newly released products - and the better the photo, the more likely it will bring you a new customer. These days, there is more pressure than ever to attract your audience within just a few seconds - while you may have an incredible product, people may scroll right past it if it isn’t eye-catching material that truly POPS!
Fortunately, there are a number of articles and videos online, that further explain the importance of product photography, as well as offer pointers on creating DIY projects. Check out the video below to learn how to build the miraculously cheap product photography box - your bank account will thank you.
Further Resources
Video: How to Build a Photo Light Box for Less Than $10
Video: Easy Product Photography with your iPhone / Smartphone
Video: Aperture, Shutter Speed, ISO, & Light Explained - Understanding Exposure & Camera Settings
Video: Photography Tips for Beginners
Links to other Resources / Articles:
Digital Cameras under $100: Kodak PixPro (Amazon), Sony Digital Camera (Amazon), Canon PowerShot (Amazon)
11 DIY Product Photography Hacks
Tips and Tricks for Product Photography on a Budget